Setup Pihole To Work With Pfsense (On Any Hardware) and To Redirect All DNS Traffic Back to Pihole

Overview
- Not all devices play nice. Some devices like to use their hardcoded DNS servers.
- We call these rogue devices.
- What this means is that the DNS traffic will reach out through the firewall to the public DNS, ignoring what your firewall's preferred DNS server is. In our case, we use Pihole.
- Let's setup a system that transparently intercepts and redirects ALL DNS traffic to an internal DNS of our choice (Pihole).
Requirements
- I'm assuming you either:
- Bought a Pfsense directly from Netgate. My recommendation is cheapest unit, US$179 SG-1100.
- OR
- You have a spare hardware, with 3 NICs. My recommendation is to get 2 of 1gbps Intel NICs because they are super cheap. How to setup
- I'm assuming you already know how to setup Pihole. How to setup.
- With that knowledge, we can continue with this guide.
Network Guide
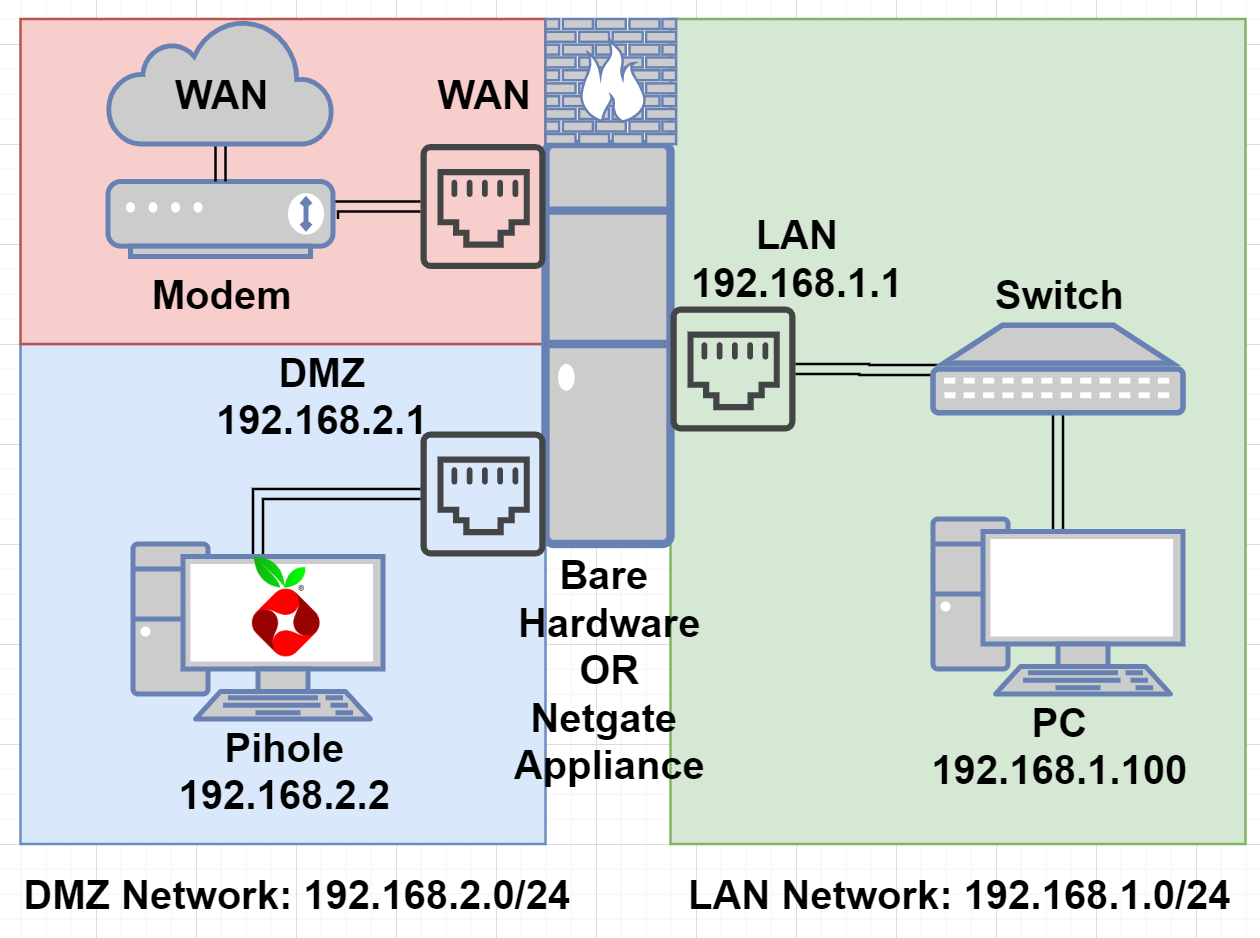
- If you're building the pfsense box from spare computer parts:
- Onboard network card attached to motherboard
- I assigned this as LAN Network in Pfsense
- Cable attached to my switch, so all devices can communicate
- First 1Gbps Intel NIC attached
- I assigned this as WAN Network in Pfsense
- There is a cable going to my Modem (and out to the internet)
- Second 1Gbps Intel NIC attached
- I assigned this as DMZ Network in Pfsense
- Cable connected to one device, Pihole (running in Raspberry Pi or another hardware of your choice)
- Onboard network card attached to motherboard
- If you bought a security appliance from Netgate, then you don't need to buy anything else.
If you installed Pfsense on Bare Hardware, read this (otherwise skip to next step):
- Pfsense, Interfaces, Assignments
- You'll see WAN, LAN, a new entry "Available network ports" (if you don't see this, it means something failed, go back to recheck your steps)
- Select Add next to this 3rd network.
- In my case, it was vmx2 (mac address)
- You'll see a Interface has been added message on top
- You'll see that the name is called OPT1
- Pfsense, Interfaces, OPT1
- Enable Enable Interface
- Description: Rename from
OPT1toDMZ(so I recognize it) - IPv4: Change from None to Static IPv4 (which just means it's statically assigned, not dynamic)
- IPv4 Address: Set as
192.168.2.1(must be on separate network from LAN network)- then change /32 to /24
- Save
- Apply
- Pfsense, Services, DHCP Server, DMZ tab
- Select Enable DHCP server on DMZ interface
- Range
- From:
192.168.2.100 - To:
192.168.2.200 - DNS Servers: [blank for now] (later, we'll set to be the IP of Pihole)
- From:
- Save
- Pfsense, Firewall, Rules, DMZ Tab, Select Add
- Action: Pass
- Interface: DMZ
- Address: IPv4
- Protocol: Any
- Source: DMZ Net
- Destination: Any
- Description:
Allows all traffic on DMZ network - Save
- Apply
- NOTE: This firewall rule enables a lot of things, so traffic can flow in/out of DMZ network. I could have been more restrictive, but for this example, it's easier to just allow everything.
- Pfsense, DNS Resolver, General Settings,
- Under Network Interfaces, make sure DMZ is selected (otherwise none of your machines on DMZ network will be able to reach 192.168.2.1 and so DNS won't work until this is fixed)
If you bought a Netgate appliance with Pfsense pre-installed, read this (skip if you followed previous step):
- When you buy a Netgate appliance, all 3 interfaces should already be setup.
- LAN, WAN and OPT1
- Pfsense, Interfaces, OPT1
- Description: Rename from
OPT1toDMZ(so I recognize it) - IPv4: Change from None to Static IPv4 (which just means it's statically assigned, not dynamic)
- IPv4 Address: Set as
192.168.2.1(must be on separate network from LAN network)- then change /32 to /24
- Save
- Apply
- Description: Rename from
- Pfsense, Services, DHCP Server, DMZ tab
- Select Enable DHCP server on DMZ interface
- Range
- From:
192.168.2.100 - To:
192.168.2.200 - DNS Servers: [blank for now] (later, we'll set to be the IP of Pihole)
- From:
- Save
- Pfsense, Firewall, Rules, DMZ Tab, Select Add
- Action: Pass
- Interface: DMZ
- Address: IPv4
- Protocol: Any
- Source: DMZ Net
- Destination: Any
- Description:
Allows all traffic on DMZ network - Save
- Apply
- NOTE: This firewall rule enables a lot of things, so traffic can flow in/out of DMZ network. I could have been more restrictive, but for this example, it's easier to just allow everything.
- Pfsense, DNS Resolver, General Settings,
- Under Network Interfaces, make sure DMZ is selected (otherwise none of your machines on DMZ network will be able to reach 192.168.2.1 and so DNS won't work until this is fixed)
If you used Raspberry Pi to setup Pihole, read this (otherwise skip to next step):
Let's verify the static IP.
sudo nano /etc/dhcpcd.conf
You’ll need to edit the numbers in the snippet so they match your network configuration.
interface eth0
static ip_address=192.168.2.2/24
static routers=192.168.2.1
static domain_name_servers=1.1.1.1
Static IP:
192.168.2.2(this is my static IP)
Static Router:
192.168.2.1(this is the gateway IP, aka the IP of the firewall)
Static Domain Name Servers (aka DNS):
1.1.1.1(use a public DNS server, in order for your Pihole to reach internet and download the ad-lists)
Press Ctrl+O to write the changes, press enter, then Press Ctrl+X to exit.
Reboot to save changes:
sudo reboot
If you used Ubuntu to setup Pihole, read this (skip if you followed previous step):
- Let's verify the static IP.
- Once pihole boots into console:
sudo sucd /etc/netplan/ls(you'll see a file called 00-installer-config.yml or one similar to it it)nano 00-installer-config.yaml(I used nano to edit this file, but feel free to use another text-editor)- IP address:
192.168.2.2/24 - Gateway:
192.168.2.1(this is the IP of pfsense gateway for DMZ network, we set earlier) - Nameservers (aka DNS):
192.168.2.1(this is the IP of pfsense gateway for DMZ network, we set earlier)
- IP address:
- Press Ctrl+O to write the changes, press enter, then Press Ctrl+X to exit.
- To apply these configuration changes, type:
netplan apply
Configure Pihole Dashboard
- Pihole dashboard, settings, DNS tab
- Remove any public DNS servers
- Set Custom 1 (IPv4) as
192.168.2.1(OR you can use192.168.1.1since they both go to pfsense) - Under Interface listening behavior, set the option Listen only on interface ens160
- Enable Use conditional forwarding
- IP of your router:
192.168.2.1(OR you can use192.168.1.1since they both go to pfsense) - Local domain name:
mylocal
- IP of your router:
- Save
caution
Under Interface listening behavior, if you set Listen on all interfaces, your Pihole won't work. Fix it by changing it to Listen only on interface ens160.
Let's send traffic to Pihole
- Pfsense, Services, DHCP Server, LAN tab
- DNS Servers:
192.168.2.2(IP of Pihole)
- DNS Servers:
- Pfsense, Services, DHCP Server, DMZ tab
- DNS Servers:
192.168.2.2(this step is optional, but to keep things consistent, we can set this)
- DNS Servers:
- The easiest way for the clients to get the DNS server from Pfsense, is to restart the clients
Apply firewall rule to redirect 'rogue devices' that use custom DNS, back to Pihole
- Pfsense, Firewall, NAT, Port Forwarding Tab, Select Add (Up-arrow)
- Interface: LAN
- Protocol: TCP/UDP
- Source: Any
- Source port: Any
- Destination Address:
- Select Invert Match
- Select LAN Address
- Destination port: DNS (port 53)
- Redirect Target IP:
192.168.2.2(Pihole IP) - Redirect Target port: DNS (port 53)
- Description:
Redirect rogue devices back to pihole
- Pfsense, Firewall, Rules, LAN tab,
- Drag the newly created rule
Redirect rogue devices back to piholeto the top of the list- It must be above the default rule of
Allows all traffic on LAN network
- It must be above the default rule of
- Save
- Drag the newly created rule
important
- Without this firewall rule, you're going to have problems when trying to redirect traffic in and out the same interface with a port forward.
- By moving Pihole to its own network segment, we can use port forward to solve this problem.
Test 1 - Normal use case
- Pfsense should push the DNS server of
192.168.2.2to any client on LAN 192.168.1.0/24 network. - Double check that your DNS is correct, otherwise, restarting the device would need to be done.
- Go to any website or use anything that connects to internet
- Go to your Pihole dashboard of 192.168.2.2, and you'll see that client's DNS queries and you'll see them being blocked!
- Everything is working as intended!
Test 2 - Custom DNS client (that's on the wired network)
- Now, let's consider the rogue client who's changed the DNS server to a custom one
- Set your PC with custom DNS (any public one)
8.8.4.4or1.0.0.1
- This means that the traffic (in a typical use case) should be ignoring Pihole right now and going directly to public DNS servers.
- Go to your Pihole dashboard of 192.168.2.2, and you'll see that client's DNS queries are being blocked.
- So to the client, DNS entries appear to be going to public servers, but in reality, they end up in Pihole because of our NAT rule.
- Everything is working as intended!
Test 3 - Custom DNS client (that's on the wireless network)
- On my cellphone, I noticed that when I set a custom DNS to be a public IP, and checked to see if all traffic was being redirected to Pihole, it wasn't.
- On my network, I have multiple wifi systems that have their own firewalls disabled, which forces everything back to pfsense.
- They are acting like Access Points (if you heard the term before).
- I have multiple wireless access points that all have custom settings:
- IP of Access points: Statically assigned on 192.168.1.0/24 network
- Gateway:
192.168.1.1(my pfsense) - Primary DNS:
- Previously set to
192.168.1.1(I set this up by default, before I had Pihole) - Now, I set it to my Pihole IP
192.168.2.2
- Previously set to
- Secondary DNS:
- Previously set to a public DNS Server
- Now, I set it [blank]
- Go to your Pihole dashboard of 192.168.2.2, and you'll see that client's DNS queries are being blocked.
- So to the client, DNS entries appear to be going to public servers, but in reality, they end up in Pihole because of our NAT rule.
- Everything is working as intended!
Confirming all DNS traffic is flowing normally
- At this stage, you shouldn't have any problems. If you want to confirm that the traffic is flowing normally, read on.
- Go to Pfsense, Diagnostics, pftop
- DNS traffic on your LAN/DMZ network
- Filter Expression:
port 53 - Sort by: Source Address
- If you see Source 192.168.1.X:YYYY => Destination 192.168.2.2:53
- This is traffic going from a LAN device to Pihole
- This is expected
- This is traffic going from a LAN device to Pihole
- If you see Source 192.168.2.2:YYYY => Destination 192.168.1.1:53
- This is traffic going from Pihole to Pfsense
- This is expected
- This is traffic going from Pihole to Pfsense
- Filter Expression:
- DNS traffic between your firewall and WAN
- Filter Expression:
port 853 - Sort by: Destination Address
- If you see Source XX.XX.XX.XX:YYYY => Destination 1.1.1.1:853 (or whatever you set)
- This is traffic going from your WAN port of Pfsense to Public DNS servers (you set in Pfsense) over port 853 (DLS over TLS)
- This is expected
- This is traffic going from your WAN port of Pfsense to Public DNS servers (you set in Pfsense) over port 853 (DLS over TLS)
- Filter Expression:
Conclusion