Setup Pfsense Port Forwarding

Disclaimer
warning
Because you're opening a port on your firewall to allow traffic from the WAN, you take full responsibility for anything that could go wrong if malicious actors infiltrate your network.
Overview
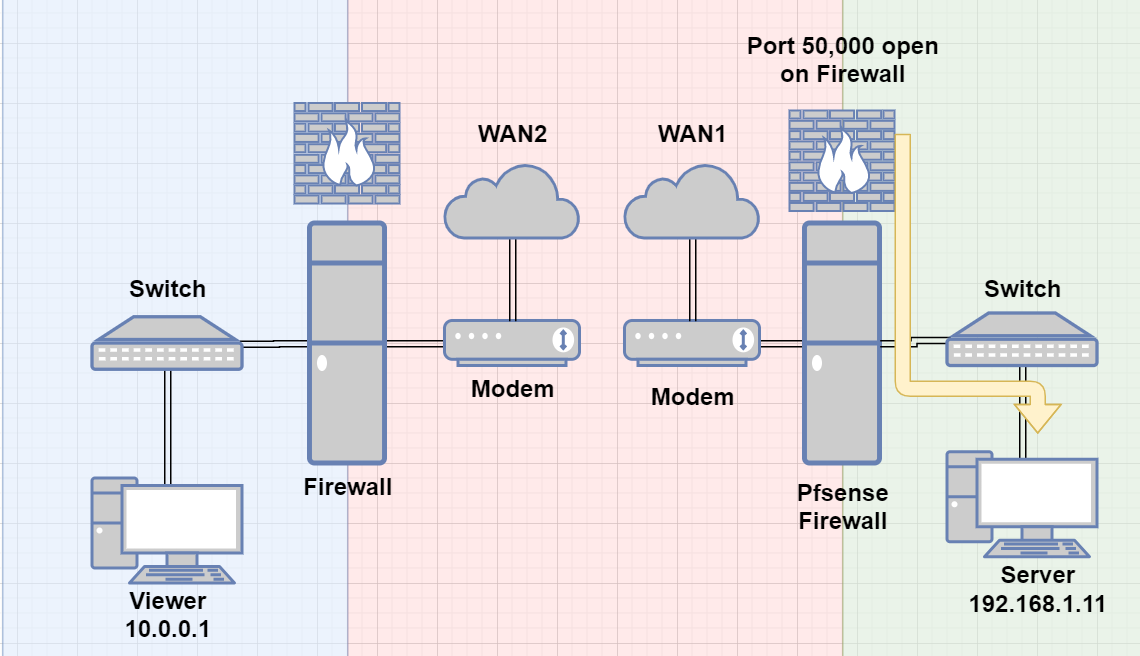
- Let's say you wish to open a port on your firewall to allow traffic from the outside world (WAN) back into your LAN network, such that the traffic goes to one pc. That's called Port Forwarding.
- To demonstrate this, I'm going to install a remote management software called UltraVNC on WAN1 and then remotely access it from WAN2.
Network Diagram
Setup and configure UltraVNC
- Download UltraVNC
- Install UltraVNC Server
- Run it
- By Default, the main port is 5900
- To increase security, let's change the default port to another one
- Open UltraVNC Server Property Page
- Change Main port to
50,000- I chose this port, and it's called 'an ephemeral port', which ranges from 49,152 to 65,535
- Change Main port to
- Change the VNC password
- This will be used to authenticate from anyone on the WAN
- I set this to be 63 random characters for maximum security.
- This machine has an IP of
192.168.1.11(must be statically assigned for everything to work properly with port-forwarding)
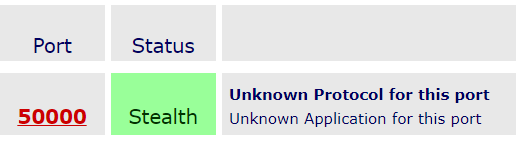
Test to make sure port your port 50,000 is currently blocked on the WAN
- Go to grc.com
- Select Proceed
- Type in
50000into white box in the middle - Select User specified custom port probe

- It should say Stealth
- meaning your firewall is blocking all traffic on that port and it's not accessible from WAN
Configure port forwarding on Pfsense
- Pfsense, Firewall, NAT, Under Port Forward Tab, Select Add
- Interface: WAN
- Protocol: TCP/UDP
- Source:
- Leave at Any IF you wish to allow anyone on the WAN to connect to you (less secure, but more flexible)
- In my case, I'm demonstrating with this selected
- Add the Public IP IF you wish to use one IP (more secure, but also means that this firewall rule is locked down to only that one IP and if it changes, the user will be locked out until the firewall rule is updated)
- Leave at Any IF you wish to allow anyone on the WAN to connect to you (less secure, but more flexible)
- Destination: WAN Address
- Destination Port Range:
- From: Select Other and type in custom port
50000(we set this previously in UltraVNC) - To: Select Other and type in custom port
50000(we set this previously in UltraVNC)
- From: Select Other and type in custom port
- Redirect target IP:
192.168.1.11(this is the static IP of the PC on the LAN, that we need to access from the WAN) - Redirect target port:
- Select Other and type in custom port
50000(we set this previously in UltraVNC)
- Select Other and type in custom port
- Description:
Port Forward port 50,000 for 192.168.1.11 PC

Test to make sure your port is open on client PC (192.168.1.11) and Pfsense can get to it
- Pfsense, Diagnostics, Test Port
- Hostname:
192.168.1.11 - Port:
50000
- Hostname:
- You'll see a successful message. This means that the pfsense firewall 192.168.1.1 is able to send traffic to pc 192.168.11 because the port on the pc is open (and everything is working as intended).
- If you see a fail message, investigate to make sure that the port on 192.168.1.11 machine is actually open and nothing is blocking it.

Test to make sure port forwarding worked, meaning it's accessible from WAN
- Go to grc.com
- Select Proceed
- Type in
50000into white box in the middle - Select User specified custom port probe
- It should say OPEN
- meaning your firewall is allowing traffic on that port and port forwarding worked

Test UltraVNC Viewer from the WAN2
- From another public IP network (WAN2)
- Install UltraVNC Viewer
- Connect to
xx.xx.xx.xx:50000(your IP:50000) - If your machine is able to reach this network, it will prompt for password (meaning port forwarding worked)
- Type in the 63 character long password that I've setup previously.
- Connect to
- Works!
- Install UltraVNC Viewer
Conclusion