Setup Of 2 Pfsense Firewalls

Overview
note
I'm assuming you already know how to setup Pfsense. See my article on how to setup it up on bare hardware. Link
Network Diagram
This is the network diagram of the setup I'm using.
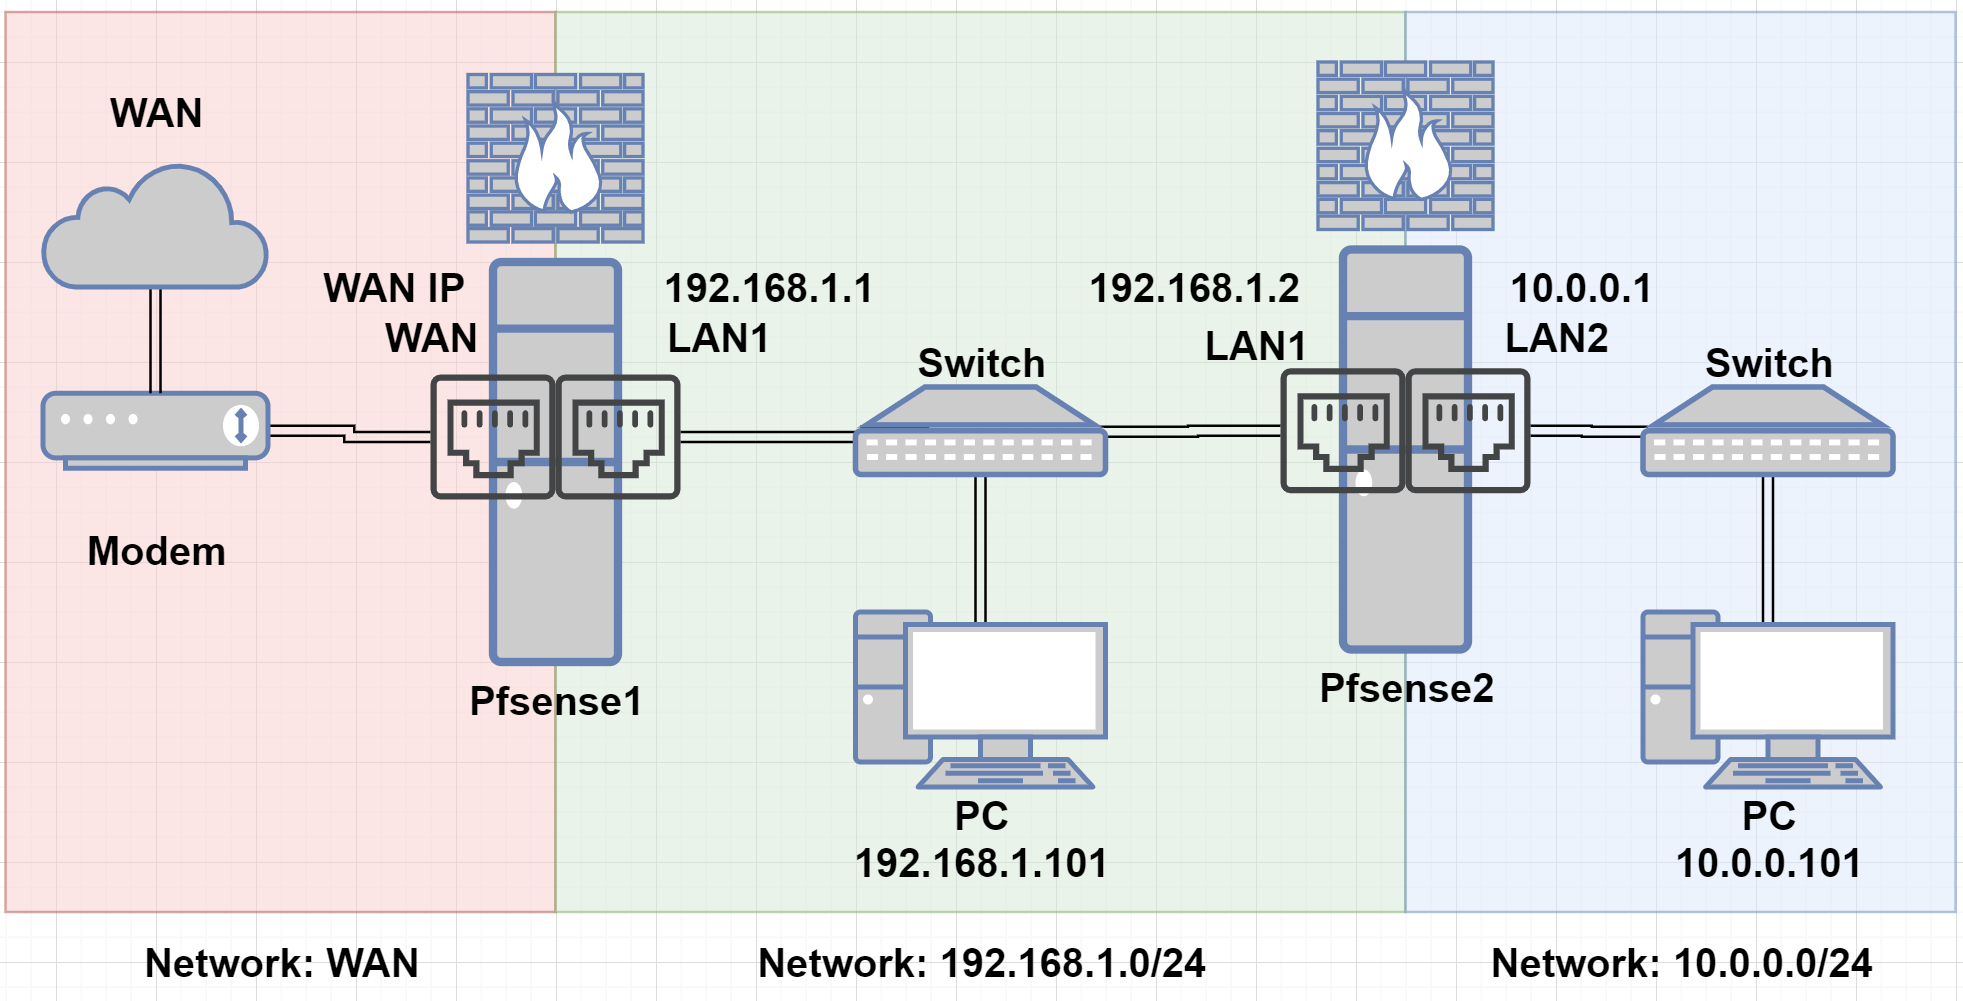
- As you can see, I have 2 pfsense firewalls setup with separate networks.
Configure 1st Pfsense
- System, General Setup:
- Hostname:
pfsense1(to suit our case)
- Hostname:
- Interface
- Default name
WAN, keep the name asWAN- Will get a public IP from 'Internet Services Provider (ISP)'
- Default name
LAN, change name toLAN1(to suit our case)- Will be on 192.168.1.0/24 network
- Default name
- System, Routing, Gateways, Add
- Interface: LAN1
- Address Family: IPv4
- Name:
ReachPfsense2 - Gateway:
192.168.1.2(which is the IP of 2nd pfsense)
- System, Routing, Static Routes, Add
- Destination:
10.0.0.0and choose /24 (which is the 2nd network range we need to get to) - Gateway: Select ReachPfsense2
- Destination:
- Firewall, Rules, LAN1, Add
- Action: Pass
- Interface: LAN1
- Address Family: IPv4
- Protocol: Any
- Source: Select Network, then type
10.0.0.0and choose /24 - Destination: Leave at Any
- Description:
Reach Pfsense2 Rule
Configure 2nd Pfsense
- System, General Setup:
- Hostname:
pfsense2(to suit our case)
- Hostname:
- Interface
- Default name
WAN, change name toLAN1(to suit our case)- Will be on 192.168.1.0/24 network
- Default name
LAN, change name toLAN2(to suit our case)- Will be on 10.0.0.0/24 network
- Default name
- System, Routing, Gateways, Add
- Interface: LAN1
- Address Family: IPv4
- Name:
ReachPfsense1 - Gateway:
192.168.1.1(which is the IP of 1st pfsense)
- System, Routing, Static Routes, Add
- Destination:
0.0.0.0and choose /32 (0.0.0.0 represents any IP on the public internet) - Gateway: Select ReachPfsense1
- Destination:
Conclusion
If you've reached this point, you're done. By configuring both pfsense1 and pfsense2 with the settings above, we have allowed any machine on network 10.0.0.0/24 to reach the internet.
Optional tweaks
What if you wish to:
- Ping your pfsense2 from 192.168.1.0/24 network
- Access your pfsense2 dashboard from 192.168.1.0/24 network
- SSH into your pfsense2 from 192.168.1.0/24 network
Then read below! If you don't wish to do these, you're done!
Optional tweak #1: How to allow private IPs to reach Pfsense2 LAN1 port
By default, pfsense always blocks private LAN IPs on it's WAN port.
So we need to fix this for pfsense2.
- From within 10.0.0.0/24 network, go to Pfsense2 dashboard (IP
192.168.1.2or10.0.0.1)- Interfaces, LAN1
- Under 'Reserved Networks': Block private networks and loopback addresses
- Select Disable
- Under 'Reserved Networks': Block private networks and loopback addresses
- Interfaces, LAN1
- From within 10.0.0.0/24 network, go to Pfsense2 dashboard (IP
This is required, otherwise steps below won't work!
Optional tweak #2: How to allow pinging of pfsense2 on 192.168.1.0/24 network
- By Default, you won't be able to ping pfsense2 (IP 192.168.1.2 or 10.0.0.1) on your 192.168.1.0/24 network.
- The reason is because pfsense2 blocks pinging on the LAN1 (originally called the WAN port)
- From within 10.0.0.0/24 network go to Pfsense2 dashboard:
- Firewall, rules, LAN1, Add
- Action: Pass
- Interface: LAN1
- Address family: IPv4
- Protocol: ICMP
- Source: Any
- Destination:
- Choose 1 of 2 options below, depending on your preference!
- Any (If you want to allow all machines on 10.0.0.0/24 network AND IP 192.168.1.2)
- Single host or alias, type
192.168.1.2(IP of pfsense2) (If you want just pfsense2 to be reachable, but not other machines on 10.0.0.0/24 network)
- Choose 1 of 2 options below, depending on your preference!
- Description:
Allows pinging
- Firewall, rules, LAN1, Add
- As soon as you allow this, you can ping pfsense2 on your 192.168.1.0/24 network.
Optional tweak #3: How to allow dashboard access of pfsense2 on 192.168.1.0/24 network
- By Default, you won't be able to reach dashboard of pfsense2 (IP 192.168.1.2 or 10.0.0.1) on your 192.168.1.0/24 network.
- From within 10.0.0.0/24 network go to Pfsense2 dashboard:
- Firewall, rules, LAN1, Add
- Action: Pass
- Interface: LAN1
- Address family: IPv4
- Protocol: TCP
- Source: Any
- Destination:
- Choose 1 of 2 options below, depending on your preference!
- Any (If you want to allow all machines on 10.0.0.0/24 network AND IP 192.168.1.2)
- Single host or alias, type
192.168.1.2(IP of pfsense2) (If you want just pfsense2 to be reachable, but not other machines on 10.0.0.0/24 network)
- Choose 1 of 2 options below, depending on your preference!
- Destination Port Range:
- Choose 1 of 2 options below, depending on your case!
- HTTP (80) (IF your System>Advanced>Admin Access>Protocol>HTTP is enabled) (not recommended)
- HTTPS (443) (IF your System>Advanced>Admin Access>Protocol>HTTPS-SSL is enabled) (recommended)
- Choose 1 of 2 options below, depending on your case!
- Description:
Allows web traffic
- Firewall, rules, LAN1, Add
- From within 10.0.0.0/24 network go to Pfsense2 dashboard:
- As soon as you allow this, you can browse to pfsense2 dashboard on your 192.168.1.0/24 network.
Optional tweak #4: How to allow SSH access of pfsense2 on 192.168.1.0/24 network
- By Default, you won't be able to reach SSH of pfsense2 (IP 192.168.1.2 or 10.0.0.1) on your 192.168.1.0/24 network.
- From within 10.0.0.0/24 network go to Pfsense2 dashboard:
- Firewall, rules, LAN1, Add
- Action: Pass
- Interface: LAN1
- Address family: IPv4
- Protocol: TCP
- Source: Any
- Destination:
- Choose 1 of 2 options below, depending on your preference!
- Any (If you want to allow all machines on 10.0.0.0/24 network AND IP 192.168.1.2)
- Single host or alias, type
192.168.1.2(IP of pfsense2) (If you want just pfsense2 to be reachable, but not other machines on 10.0.0.0/24 network)
- Choose 1 of 2 options below, depending on your preference!
- Destination Port Range: SSH (22)
- Description:
Allows SSH traffic
- Firewall, rules, LAN1, Add
- From within 10.0.0.0/24 network go to Pfsense2 dashboard:
- As soon as you allow this, you can reach SSH of pfsense2 on your 192.168.1.0/24 network.
Conclusion
